
Zap 3 or 4 whole unpeeled garlic cloves in the microwave for about 20 seconds (or you can roast them in the oven, of course). Then simply pop them out of the peels for this recipe.
Combine in blender:
Garlic cloves
A 15-oz. can of garbanzo beans, including liquid (a 16-oz. can would be fine too, if that's what you have)
1/8 cup olive oil
2 to 3 teaspoons of apple cider vinegar or lemon juice
1/4 tsp salt
1/8 tsp ground black pepper
1/4 to 1/2 teaspoon ground cumin
Blend until smooth. You may have to pulse it and stop occasionally to stir with a spoon to release a trapped air bubble, as this is very thick. You can add a bit more olive oil, plain yogurt or water if necessary to blend it.
Serve with crackers, bread, chips, raw vegetables and/or whatever else you like to dip. :)
Feel free to tweak the amounts of seasonings, or to add your favorite flavor--sun-dried tomatoes, roasted red peppers, kalamata olives or fresh green herbs instead of the cumin might be tasty (though probably not all together. :) ). If your beans aren't already salted, you may want to increase the salt.
Showing posts with label snacks. Show all posts
Showing posts with label snacks. Show all posts
Wednesday, June 22, 2011


Thursday, February 28, 2008
Healthy Chocolate Smoothie
Place in blender:
1 ripe banana
8-10 oz. water, milk, kefir, or dairy substitute
[optional] A handful (about 1/8 to 1/4 cup) of raw cashews, blanched almonds, or nuts/seeds of your choice.
1 Tablespoon unsweetened powdered baking cocoa (if you prefer your chocolate less dark, reduce to 1-2 teaspoons, or substitute carob if desired)
About 1 cup ice, as desired (crushed ice works best)
Blend until smooth and enjoy!
I make this in a personal-size blender with just water, cashews, banana, cocoa and ice. It makes a quick snack high in protein and free of grains and refined sugars. The banana is sweet enough that no other sweetener is necessary. This is my standby when I get chocolate and/or sugar cravings. It satisfies my sweet tooth without giving me the later energy/mood crash or heightened cravings I usually get when eating sugary chocolate.
For a NT-style smoothie, use raw milk, kefir or coconut milk and soak or sprout any nuts or seeds before blending.
1 ripe banana
8-10 oz. water, milk, kefir, or dairy substitute
[optional] A handful (about 1/8 to 1/4 cup) of raw cashews, blanched almonds, or nuts/seeds of your choice.
1 Tablespoon unsweetened powdered baking cocoa (if you prefer your chocolate less dark, reduce to 1-2 teaspoons, or substitute carob if desired)
About 1 cup ice, as desired (crushed ice works best)
Blend until smooth and enjoy!
I make this in a personal-size blender with just water, cashews, banana, cocoa and ice. It makes a quick snack high in protein and free of grains and refined sugars. The banana is sweet enough that no other sweetener is necessary. This is my standby when I get chocolate and/or sugar cravings. It satisfies my sweet tooth without giving me the later energy/mood crash or heightened cravings I usually get when eating sugary chocolate.
For a NT-style smoothie, use raw milk, kefir or coconut milk and soak or sprout any nuts or seeds before blending.
Saturday, January 27, 2007
Honey-Cereal Candy
This is the vegan, corn-free, gluten-free, soy-free version of rice krispies treats. No marshmallows or refined sugars involved.
If you cook the syrup a little longer, it will be more reminiscent of the honey-sesame hard candies with a texture like nut brittle.
You can substitute other kinds of cereal, such as puffed rice, crispy rice cereal, the round O's type of cereal, or a mixture of several kinds. Different cereals will absorb varying amounts of liquid, so start with 3 cups of cereal and add enough so that the caramel is evenly coating all the cereal without collecting pools of liquid.
The cooking time and temperature given gets the caramel to a soft- or medium-ball stage. This yields a soft, slightly chewy texture at room temperature.
For a chewier, stiffer or even crunchy candy, just increase the cooking time until the caramel reaches a higher temperature and the desired stiffness. Drop a small amount of the syrup into cold water to test what it will be like when cooled.
Ingredients:
1 cup honey
1/3 cup oil (I used safflower oil)
1/4 teaspoon salt
4 and 1/2 cups puffed millet
Instructions:
Oil an 8 x 8 or 9 x 13 pan.
Cook the honey, salt and oil over medium heat, stirring constantly. Make sure that you use a saucepan large enough to handle the honey mixture boiling up to several times its height--probably at least a 1 to 2 quart pan.
Bring to a boil and cook for approximately 10 minutes, until a candy thermometer reads 250 degrees F. The mixture will thicken and darken in color, and a drop of the syrup will have the texture of chewy caramel when cooled.
Remove caramel from heat and stir in the cereal. Smooth the mixture into the oiled dish and allow to cool slowly to room temperature.
While it's still slightly soft, cut the candy into small squares (2" or so is good, but you'll want to make them bite-sized if you cooked the caramel to a hard ball or hard-crack stage). The recipe as written will stay soft enough to cut at room temperature, but don't try to refrigerate it first and then cut it. :)
If you have leftovers, wrap each piece individually in plastic wrap and refrigerate or freeze the pieces in a larger bag. The colder the candy gets, the harder it is.
If you cook the syrup a little longer, it will be more reminiscent of the honey-sesame hard candies with a texture like nut brittle.
You can substitute other kinds of cereal, such as puffed rice, crispy rice cereal, the round O's type of cereal, or a mixture of several kinds. Different cereals will absorb varying amounts of liquid, so start with 3 cups of cereal and add enough so that the caramel is evenly coating all the cereal without collecting pools of liquid.
The cooking time and temperature given gets the caramel to a soft- or medium-ball stage. This yields a soft, slightly chewy texture at room temperature.
For a chewier, stiffer or even crunchy candy, just increase the cooking time until the caramel reaches a higher temperature and the desired stiffness. Drop a small amount of the syrup into cold water to test what it will be like when cooled.
Ingredients:
1 cup honey
1/3 cup oil (I used safflower oil)
1/4 teaspoon salt
4 and 1/2 cups puffed millet
Instructions:
Oil an 8 x 8 or 9 x 13 pan.
Cook the honey, salt and oil over medium heat, stirring constantly. Make sure that you use a saucepan large enough to handle the honey mixture boiling up to several times its height--probably at least a 1 to 2 quart pan.
Bring to a boil and cook for approximately 10 minutes, until a candy thermometer reads 250 degrees F. The mixture will thicken and darken in color, and a drop of the syrup will have the texture of chewy caramel when cooled.
Remove caramel from heat and stir in the cereal. Smooth the mixture into the oiled dish and allow to cool slowly to room temperature.
While it's still slightly soft, cut the candy into small squares (2" or so is good, but you'll want to make them bite-sized if you cooked the caramel to a hard ball or hard-crack stage). The recipe as written will stay soft enough to cut at room temperature, but don't try to refrigerate it first and then cut it. :)
If you have leftovers, wrap each piece individually in plastic wrap and refrigerate or freeze the pieces in a larger bag. The colder the candy gets, the harder it is.
Thursday, November 09, 2006
Root Vegetable Chips
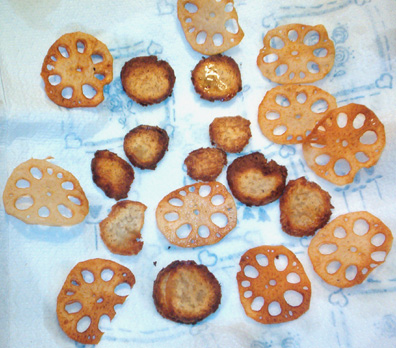
These non-potato chips are nightshade free and can be made free of any allergen by adjusting the type of root vegetable, oil and seasoning used. They are remarkably easy, and have a satisfying crunch and nice flavor.
You can use just about any root vegetable--parsnip, taro, and yam are some I've seen used. One I haven't seen used before is lotus root. It works very well, and as an added bonus the chips are very pretty to look at also.
I made some chips last night out of baked taro and raw lotus root, sliced thinly. The taro didn't work as well--perhaps because I sliced the chips too thickly and cooked them at too high a heat. Or possibly because I had baked the taro previously for fear of undercooking (taro root is not edible if not fully cooked, and can irritate hands and mouths if not handled raw).
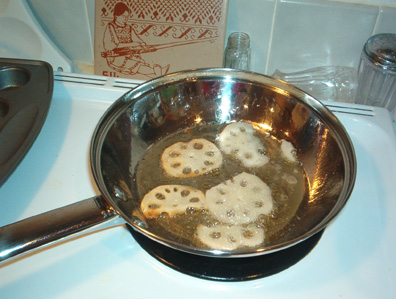
The lotus chips turned out beautifully. I peeled the lotus root and sliced it thinly. Then I heated about 1/4 inch of grapeseed oil in a stainless steel pan and fried the slices on both sides just until golden brown.
I started out with too high of a temperature initially, and they got a little too brown.
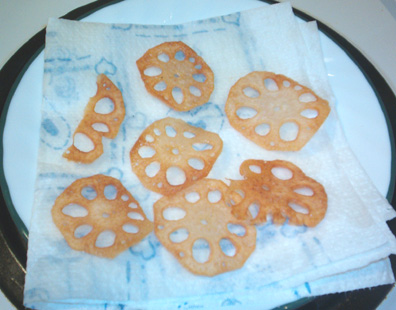
With the second batch I turned the heat down to about 4 on a scale of 1-10. They cooked more slowly, but ended up nicely crispy without getting burnt.
I forked them out onto a paper towel, which absorbed some of the extra grease. Then I sprinkled them with salt and we ate them.
Next time I think I'll try lightly coating them with oil and baking them in the oven.
Subscribe to:
Posts (Atom)