
This drink turned out quite tasty, not unlike a non-alcoholic frozen strawberry margarita. I didn't measure anything, so I'm guessing at quantities after the fact. Next time I'll measure the ingredients and come back to revise the post with more specific amounts.
Pour into blender approximately:
1/2 cup tapioca drink base
1/4 cup of any other fluid (I used rice milk--you could just use more tapioca base if necessary, or leave this out altogether)
About 4-6 ounces frozen strawberries (maybe 8 or 10 berries?)
A few tablespoons or 1/4 cup grapefruit juice, or a quarter of a fresh peeled grapefruit.
The equivalent of 1 to 2 tablespoons sweetener (I used 1 packet of stevia powder plus 6 drops of liquid stevia). The amount will depend on your tastes and the tartness of the fruit used. I recommend starting with no sweetener at all and adding sweetener to taste only if needed.
Process the drink until smooth, serve and enjoy!
Thursday, December 28, 2006
Tapioca Drink Base
Since we discovered that my daughter was aspirating thin fluids, we make up several cups at a time of this tapioca thickening base and add it to all kinds of things. We mix it about half and half for the child with aspiration issues, and it helps to keep whatever she drinks from ending up in her lungs.
You can expect to see more recipes featuring this base soon--it makes a nice substitute for milk and other thickening/smoothing agents in smoothies and other beverages.
Mix 1 tablespoon tapioca starch per 1 cup of cold water.
Heat, stirring frequently, until almost or just barely boiling. If cooking on the stovetop it may be a bit smoother as you can stir it more constantly, but I usually do it in the microwave. In the microwave I start off with 1 minute, then continue cooking in 30-second increments, stirring well at each pause.
The mixture will thicken and become more transparent-looking (less like white powder mixed into water, and more like a cohesive whole). Stop cooking it at that point, or it will begin to separate again.
You can store this in the refrigerator and mix it with other fluids to thicken them without needing to reheat it. If it gets lumpy, put it in the blender and it will become smoother but slightly less thick.
Tuesday, December 19, 2006
Chicken Vegetable Soup
Here's a simple soup recipe that was a hit with everyone in the family.
Soup is a very flexible and forgiving dish to cook. You can freely substitute types of vegetables and meat, and adjust quantities for your tastes. Add cooked beans instead of the meat for a vegan version.
Fill a 4-quart or larger pot about half-full with water or soup stock.
Put in:
1 to 1 1/2 lbs chicken (I used 7 chicken thighs)
1/2 teaspoon salt (1 teaspoon if water is used instead of chicken stock. You may need more salt if the chicken is not pre-salted--I use Foster Farms frozen chicken, which has salt added)
1/4 tsp pepper or to taste
As you add ingredients, keep adding enough water or soup stock (chicken or vegetable broth) to cover generously. Bring to a boil. Meanwhile, cut up and add any vegetables of your choice. This time I used:
2 carrots
1 peeled kholrabi bulb and 2 or more kholrabi leaves (A kholrabi bulb is about the size of a child's fist. You can substitute any other bulb vegetable, such as a small turnip, rutabaga or part of a jicama, along with a few leaves of any dark green leafy vegetable.)
1 medium onion
1 clove garlic
2 stalks celery
1 or more bok choy leaves (you can substitute cabbage)
As you may have noticed, I listed the firmest vegetables first. They take longer to cook, so go ahead and add them as you chop them up. You'll want to bring the water to a boil after adding the carrots and kholrabi, and cook over medium-high (6 or 7 on a scale of 1-10) heat for 5-10 minutes or more while you cut up the other vegetables. Add the bok choy last, because it cooks faster than the other items.
After the chicken has been cooking for a while, if you didn't cut it up before adding it initially, take the pieces out and cut into bite-sized chunks, then add them back in to the soup.
Simmer over medium-low heat (3-4) until chicken is thoroughly cooked and vegetables are tender, 30-45 minutes. If you want to cook it longer you can turn the heat down to simmer and cook for 1 to 3 hours.
Serves 4 to 6
This is good served with noodles or a cooked grain. You can add these directly to the soup shortly before serving, or serve them separately and let each person add the desired amount. I served buckwheat noodles with this soup. Alternatively, you could serve bread or muffins on the side.
Sunday, December 03, 2006
Ginger-Orange Pinwheel Rolls
Here's a recipe I developed tonight on the cinnamon-free theme.
These pinwheel rolls are made with a biscuit dough, so they are yeast-free as well as egg, dairy and corn free. For those allergic to cinnamon they make a nice substitute for cinnamon rolls, with ginger and orange to give them flavor.
Don't expect a yeast-bread texture; these rolls are soft and somewhat crumbly, as you would expect from a biscuit. They are not oversweet.
The recipe should work with 2 1/2 cups of a gluten-free flour blend instead of the whole wheat and tapioca flour--I recommend 1/2 to 1/3 the amount of tapioca or sweet rice flour when using a grainy gluten-free flour such as rice or millet flour.
These rolls are good served warm.
Mix together in large bowl:
1/2 cup tapioca flour
2 cups whole wheat flour (I used King Arthur Traditional Whole Wheat Flour)
1/2 tsp salt
1 tsp baking soda
1 1/2 tsp cream of tartar (or 1 1/2 Tablespoons lemon juice)
3 tablespoons turbinado or demerara sugar
In separate (microwave or stovetop safe) container, beat together until smooth:
1/2 cup honey
1/2 cup orange juice (I used Italian Volcano Organic Blood Orange juice, which has an especially strong flavor that makes it nice for cooking)
1 Tablespoon finely grated fresh ginger
2 Tablespoons tapioca starch
2 Tablespoons oil
Heat the honey mixture for 30 seconds at a time in the microwave or over low heat on the stovetop until slightly thickened, stirring frequently. Stir again and pour the honey mixture into a 7x11x2 inch baking dish (6x10 will work also). Set aside.
To flour mixture, add
1/3 cup oil (I used grapeseed oil)
3/4 cup water or milk substitute (I use unenriched Rice Dream Original)
Stir together dough just until mixed. If necessary add enough flour to roll out.
Roll dough out in a rectangle approximately 9x15 inches. Sprinkle over the dough a mixture of:
1/2 tsp finely grated fresh ginger
3 Tablespoons brown sugar (C & H is corn-free)
Roll up like a jelly roll, starting with the long side. Cut the roll into 1 inch slices.
Lay rolls cut side down in the syrup, flipping to coat both sides, and space evenly in the dish.
Bake until browned, approximately 20-25 minutes, at 425 degrees.
Makes about 15 rolls.
Ask the Gourmet: Cinnamon Substitutes
Found your Restricted Gourmet this morning; holidays always rev up my "what to do about the cinnamon thing" motor!
My husband is allergic to "trees, grass & dirt", with the tree thing being a really big one (when skin testing, the allergist had to cut the test dose, what? I think it was one ten-thousandth of the regular test dose, before they got a reaction that didn't scare THEM). Anaphylactic reaction; I don't even keep cinnamon/cassia in the house.
Anyway, I have been hunting for a work-around for cinnamon for years, and thought maybe one of your blog-visitors might have an idea. I sometimes substitute ginger, for the heat, but sometimes there just doesn't seem to be any possibility than completely leaving the cinnamon out. We've never tried cassia, but it's tree bark too.
Thanks for any ideas or info,
Patsy
Hi, Patsy! Thanks for writing. I'm sorry to hear about your husband's allergies. Is he allergic to any product that comes from any tree (tea, paper, maple syrup, apples, nuts, etc.) or just pollen and cinnamon?
Usually the "tree mix" allergists use for skin testing is a mixture of pollens from trees local to your regional area. Most people who are allergic to tree pollen can handle other tree-derived products, or products from other types of trees.
"Tree" is such a large category and includes a great variety of different botanical families. Did the allergist give any guidance in exactly which trees or types of trees to avoid? The allergist also should have been able to tell what part(s) of dirt your husband was allergic to. For example, dust mites and mold are common allergens that are often found in dirt and dust.
As I'm sure you know, much of the "cinnamon" on the American market is not actually cinnamon, but is from a different tree (closely related, though) called cassia or chinese cinnamon. According to this page, anything labeled "cinnamon oil" made in the United States is actually oil of cassia. Much of the powdered cinnamon on the market is also cassia. This kind of mislabeling is common.
So in some cases it could be theoretically possible that someone could think they are allergic to cinnamon when in reality they are allergic to cassia, or vice versa. Of course, with an anaphylactic reaction you probably don't want to try anything that closely related anyway. Both cinnamon and cassia are fairly common allergens.
Cinnamon can be difficult to avoid, especially since in many products it can be simply labeled "spices" or "natural flavors" on the ingredient list. Cinnamon can hide in unexpected places such as curry powder, garam masala, chocolate, liquor, coffee, fruit and vegetable dishes, and just about anything sweet or spicy. Even cinnamon in candles or in air fresheners can cause allergic reactions for people breathing in the fumes.
Contrary to popular belief, cinnamaldehyde or artificial cinnamon flavoring is often derived from the cinnamon plant, although it can be made from benzaldehyde and acetaldehyde.
Can he have allspice and other aromatic spices? Most of them are from trees as well. Clove, nutmeg & mace (they come from the same plant), allspice, bay leaf (sweet laurel), and star anise are all from evergreen trees, as are cinnamon and cassia. Cumin, black pepper, cardamom and ginger are some spices that would add some heat without being from trees. Anise seed (the annual herb anise, not the star anise from a tree), molasses or honey will give a sweet flavor without being tree-derived.
Some of the suggested spices to substitute for cinnamon include nutmeg, allspice, cardamom or cloves. Some sources recommend a combination of 2 parts coriander and 1 part cardamom as a cinnamon substitute. Since many other aromatic spices are more strongly-flavored than cinnamon, you might want to start with half the amount of cinnamon called for in the recipe and adjust from there to taste.
You might also consider trying an herb with a cinnamon-like flavor, such as the cinnamon basil used in these recipes.
According to a quick internet search, other substitutes for cinnamon have historically included sweet flag or Acorus calamus (illegal as a food additive in the USA), sweet shade (calycanthus floridus), black sassafrass (a.k.a. Oliveri Cortex or Oliver's Bark--closely related to cinnamon), Cinnamon Myrtle (Backhousia myrtifolia--also an evergreen), Coluria geoides, and Perilla.
It seems that the appropriate substitute would really depend on the dish you were making. For example, in pancakes or waffles nutmeg is good, while in another dish like a pie I might substitute allspice and/or ginger. Ginger, butter and sugar makes a nice substitute for cinnamon sugar on toast.
In many recipes you might want to consider changing the flavor completely by using lemon peel, chocolate, almond extract, black pepper, anise, coconut, vanilla or maple syrup instead of cinnamon. In some recipes you can just use brown sugar or molasses for flavor instead of adding spices.
Do you have a particular dish or dishes you want to make, that you'd like me to experiment with developing a recipe for?
Purple_Kangaroo
Note: I am not an expert of any kind. This is not intended to be medical advice; please check with your doctor or allergist before trying any food you're not sure of.
Thursday, November 30, 2006
Laundry Soap
Most surfactants in soaps are made from corn, soy or coconut, and many people with allergies or sensitive skin have problems with commercial laundry detergents.
Depending on the type of bar soap you use, this laundry soap can be made free of corn, soy, coconut and other common allergens. Any soap you can tolerate for washing yourself should be tolerated in a laundry soap. If you like, add a few drops of your favorite essential oil or tea tree oil for a nice scent and some extra antibacterial qualities.
Dry:
Grate a bar of your favorite soap to make soap flakes (many people like to use Fels Naptha; I used Kiss My Face Pure Olive Oil Soap) with a cheese grater or shred it with a knife.
Mix 1 cup (probably half a bar of soap) of soap flakes with
1/2 cup borax and
1/2 cup washing soda
Use about a tablespoon per load of wash (2 tablespoons for a large or heavily-soiled load).
Fill the bleach dispenser with vinegar if desired to help wash out any soap residue. (Use a white vinegar such as rice or white wine vinegar if you can't tolerate the regular corn-derived distilled white vinegar. Apple cider vinegar will stain your clothes.)
Liquid:
Melt 1 cup soap flakes in about 4-6 cups of water over low heat on your stove.
Add 1/2 cup Borax and 1/2 cup washing soda, and stir until dissolved and a bit thickened.
Pour into a bucket or large bowl and add about a quart (4 cups) of hot water. Stir. Add enough cold water to make about 2 gallons of soap.
Pour into containers with lids (buckets, large plastic storage containers or empty, clean jugs would work) and let cool. You can use this right away, but it may take 24 hours to thicken like regular laundry soap. If it seems too thick, use less or add more water.
I use a soup ladle and put between 1/2 cup and 1 cup in my front-loading washer. You may need to experiment with the amount needed for your washer and water quality.
Fill the bleach dispenser with vinegar if desired to help wash out any soap residue. (Use a white vinegar such as rice or white wine vinegar if you can't tolerate the regular corn-derived distilled white vinegar. Apple cider vinegar will stain your clothes.)
Notes for either type of soap:
I always add an extra rinse in addition to using the vinegar, because we have very sensitive skin in my household.
Washing soda and borax can be found near the laundry soaps in most grocery stores. Look on the top or bottom shelf in an inconspicuous place like behind a pillar. No, really. You may have to ask a store employee to help you find it, and even they may not know where it is, but most large grocery stores do seem to carry it.
Be careful with washing soda; it is caustic and will irritate your skin. You should wear gloves when handling it and wash it off right away if it gets on your skin.
Washing soda and baking soda are both made by Arm & Hammer, but they are not the same thing. Washing soda, or sodium carbonate (Na2CO3), has a PH of 11 (7 being neutral). Baking soda, or sodium bicarbonate (NaHCO3), has a PH of 8.1. Washing soda is about twice as strong a base as baking soda.
If you can't find washing soda in your grocery store, look for 100% sodium carbonate swimming pool PH adjuster in a pool supply store. Or you can contact Arm & Hammer directly.
20-Mule-Team Borax by Dial Corp. seems to be the most commonly available brand of Borax. Borax is Sodium Tetraborate Decahydrate (Na2B4O7*10H2O).
Please note that soap-based cleaners are usually not recommended for washing diapers. Supposedly they will cause buildup that makes the diapers less absorbent. Most people recommend using a detergent rather than a soap for this purpose.
Thursday, November 23, 2006
Minimalist Pumpkin Pie
Most of the comments in this earlier pumpkin pie recipe also apply to this one. This one, however, is made with no coconut milk, and is a bit sweeter and less spicy to balance the flavors in the absence of eggs and dairy-like products.
First, make a pie crust. Gluten-free recipe here, grain-free version here.
Put crust in pie pan and bake for 5-10 minutes or until crust is just a bit firm on the bottom.
Combine in blender:
2 cups mashed cooked pumpkin
1 1/2 tsp cinnamon
3/8 tsp ginger
1/8 tsp cloves (heaping, more like 3/16 tsp)
1/8 tsp nutmeg
1/4 tsp salt
1/4 cup tapioca flour
3/4 cup honey
1/4 to 1/2 cup water or milk substitute. The amount of liquid needed will depend on the texture of your pumpkin and how much liquid is in it. Add just enough liquid to process the mixture in the blender--you don't want to make it watery.
Blend until smooth.
Pour into pie crust and bake for 1 hour at 350 degrees.
Chill before serving.
Monday, November 20, 2006
Chocolate Chip Muffins
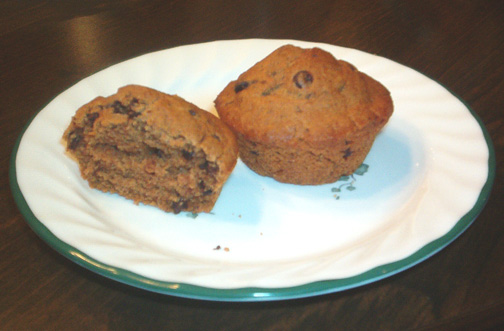
Mix together dry ingredients:
2 cups flour (I used 1 cup King Arthur traditional whole wheat, 1/2 cup whole barley flour, 1/2 cup tapioca flour. If using a gluten-free flour such as rice or amaranth, I suggest using 1/3 to 1/2 the total amount of tapioca flour.)
1 1/2 tsp cream of tartar (or 4 tsp lemon juice or cider vinegar)
3/4 tsp baking soda
1/2 tsp salt
3 Tbsp turbinado sugar or C & H brown sugar
In another container, blend together
1 Tbsp flaxseed meal mixed with 3 1/2 Tbsp hot water & heated until gelled
3 Tbsp oil (I used grapeseed oil)
1 cup water or your favorite milk substitute
Make a hollow in the top of the dry ingredients. Add wet ingredients all at once and quickly mix just until barely blended.
Stir in approximately 1/4 to 1/2 cup of Enjoy Life chocolate chips, or the fruit or nuts of your choice (optional).
Spoon into oiled muffin pan, filling cups about 2/3 to 3/4 full.
Bake at 425 degrees for 20 minutes.
Makes 12 regular-sized muffins.
Saturday, November 18, 2006

Pumpkin or Squash Pie Reinvented

This pumpkin or squash pie is free of dairy, soy, eggs, gluten, rice and most other allergens. It's also vegan.
The pie has a very silky texture, softer and more pudding-like than a traditional pumpkin pie. To make a grainless pumpkin pudding, just bake the filling with no crust.
I was going to try making it without the baking soda and cream of tartar, and calculate the baking time more carefully. But then I discovered that I'd developed an allergy to coconut, so I won't be making it again.
If you try it, please do post any improvements or adjustments you make in the comments.
Feel free to adjust the spice amounts for whatever you usually use in a pumpkin pie. Remember that you're not adding the eggs, so you'll probably want a lesser amount of spice in a pie than one with eggs.
Pumpkin or Squash Pie
First, make crust. Gluten-free recipe here, grain-free version here.
Put crust in pie pan and bake for 5-10 minutes or until crust is just a bit firm on the bottom.
Pie filling:
Mix together dry ingredients:
1/4 cup tapioca flour
1 1/2 tsp ground cinnamon
1/4 tsp ground ginger (I measured this heaping)
1/4 tsp ground nutmeg
1/4 tsp ground cloves (measured scant)
1/4 tsp salt
1/2 tsp baking soda
1/4 tsp cream of tartar (if allergic to grapes or sulfites, substitute about 1/2 to 1 tsp lemon juice or cider vinegar with the wet ingredients)
Combine in a separate bowl:
1 15-oz can Libby's Pure Pumpin (not pumpin pie filling--just plain pumpkin) or 1 1/2 to 2 cups squash puree*
1/2 cup coconut milk (I use Trader Joe's light coconut milk; it's corn-free and lower-fat, too) or other milk substitute (for a recipe using plain water, see here)
1/2 cup pure honey or other liquid sweetener
Blend pumpkin mixture into dry ingredients until smooth, and immediately pour into pie crust.
Bake at 350 degrees for 30-45 minutes or until set in the middle. A knife will not come out clean when it's finished; it will still be very gooey in the middle until chilled. Don't be concerned if it puffs up a bit in the middle and then collapses as it cools.
Chill before serving.
* If you want to use a fresh pumpkin (or any kind of winter squash such as butternut or acorn squash), you can make your own squash puree.
Bake it whole (or cut in half face-down with 1/2 inch of water in the pan) at 350 degrees in the oven until tender. Scoop out the flesh and mash it with a potato masher.
Then use the blender to process it into a smooth puree. You can add all the other ingredients to the blender and just mix it all up in there if you like instead of mixing wet and dry ingredients separately.
Friday, November 17, 2006
Gluten-Free Pie Crust
Mix together:
1 1/4 cups quinoa flour or other gluten-free flour
1 Tablespoon tapioca starch/flour
1/4 tsp salt
1/2 tsp cinnamon
3 Tbs brown sugar (I use C & H; it's pure cane sugar and corn-free) or other sweetener (you probably won't need as much if any sweetener if another flour is substituted; quinoa flour needs the sugar to cut the bitterness)
Cut in until the lumps are about the size of sunflower seeds:
1/2 cup shortening (I use non-hydrogenated 100% pressed palm kernel oil vegetable shortening by Spectrum, you can use coconut oil, butter or lard.)
Add, one tablespoon at a time, until moist enough to work with:
5-7 Tablespoons ice water (5 1/2 tablespoons would have been about perfect for my crust)
Pat or roll out between two layers of plastic wrap or waxed paper. If you'll be baking the pie in the crust, bake the crust by itself for 5-10 minutes or just until the bottom is starting to get firm before adding the filling. That will keep the crust from getting soggy. You may need to put foil around the edge of the pie to keep it from getting too brown during baking.
Grainless Crackers or Pie Crust

These crackers or pie crust are made with tapioca flour (made from cassava, a root vegetable), so there is no grain or seed in the recipe at all. They are gluten-free and free of most other allergens as well.
The recipe makes crackers that are nicely crispy and quite normal-looking. They have a pleasant, slightly powdery taste.
Grainless Crackers
Mix:
1 1/2 cups tapioca flour
1/2 tsp baking soda
1/8 tsp salt
Cut in:
1/2 cup non-hydrogenated shortening (palm kernel or coconut oil) or lard
In separate bowl, cream together:
1/4 cup honey or other liquid sweetener
1 Tablespoon fresh-squeezed lemon juice (you can substitute 2 teaspoons cider vinegar, or mix 1/2 tsp cream of tartar into the dry ingredients)
Add the honey mixture to the tapioca mixture and stir just until it sticks together in a ball.
This will make a very stiff dough. You can add water a teaspoon at a time until the dough sticks together if it's too crumbly, or add more tapioca flour if it's too sticky.
Roll or pat out very thin, approximately 1/16 to 1/8 inch thick, using half the dough at a time between two sheets of plastic wrap. Use a knife to cut into 2-3 inch squares, or cut with cookie cutters. You can also make little balls of the dough and flatten them between your palms, but they will not be as thin and will be more cookie-like and crumbly.
Bake at 350 degrees for 8-10 minutes. The crackers will be a light golden-brown. I used a baking sheet with an air-filled center and that helped to keep them from burning on the bottom.
Variations: Try adding your favorite spices (cinnamon, allspice, pumpkin pie spice, aniseed), more lemon juice and sweetener, or some cocoa and a little more honey. I'll update this post to include specific amounts as I experiment with variations.
Pie Crust: Reduce the honey to 2-3 tablespoons, add enough water to work, and roll out in a 9" circle. Put into pan and bake for 4-5 minutes to solidify before adding filling and baking the pie.
Shampoo and Toothpaste Substitutes
Virtually all soaps, shampoos and toothpastes contain ingredients derived from corn, soy, and/or coconut. For someone allergic to all three, or with multiple chemical sensitivities (MCS) the options are extremely limited.
Here is a way to get your hair and teeth clean with good old baking soda. This is about as hypoallergenic as you can get.
Shampoo Substitute
Take about 2 tablespoons of baking soda (bicarbonate of soda) and add enough water to make a paste. Rub into your scalp and rinse.
If desired, follow with an acid rinse to restore PH balance: Use about 2 tablespoons fresh-squeezed lemon juice or apple cider vinegar mixed with about a cup of water, being sure to get the ends of your hair.
Rinse with plain water.
Toothpaste Substitute
You can use plain baking soda or a baking soda/additive-free salt mixture as toothpaste.
Tuesday, November 14, 2006
Roasted Vegetables or Tubers

Thanks to some commenters on the Purple Puzzle Place blog, I've discovered a new favorite way to cook many kinds of vegetables: roasting.
Roasting works well for cauliflower and for just about any kind of root vegetable. So far I've tried it with potatoes, carrots, jicama, and lotus root, as well as our favorite cauliflower. Yams, taro, turnips, squash, parsnips, cassave (yuca) roots, and many other vegetables should work just as well.
The basic recipe is pretty simple:
Preheat the oven to about 475 degrees.
Cut your vegetable(s) of choice into approximately 1 inch chunks. Put them into a plastic bag and drizzle your favorite healthy oil over them. Just shake and squish the bag to evenly distribute the oil.
I use about 1/4 cup of olive oil for a whole cauliflower or 6 potatoes--you want just enough to coat the vegetables.
Spread the oiled vegetables in an uncovered baking dish. I usually use a 9 x 13 glass dish. If you can get the vegetables in a single layer they will cook a little better, but if not just spread them as thinly as possible and stir a little more frequently while cooking.
Bake at 475 for about 15 minutes, then stir. Bake for another 15-30 minutes (depending on the vegetable) or until the vegetables are getting tender and browning on the edges. Stir every 10 minutes or so.
Some vegetables I like to cook until they're getting almost black on the tips and edges, but you can adjust this to your taste. Cauliflower is particularly good this way, as it carmelizes and develops a savory rich flavor with hints of sweetness. Even my family members who "hate" cauliflower will eat it roasted this way.
For extra flavor, you can add some leeks or onion, a clove or two of minced garlic, herbs, spices or salt and pepper. I like to mix various vegetables and flavorings for variety, and just sprinkle with sea salt to taste.
You can chop the vegetables and coat them with oil ahead of time. I've done this with olive oil, garlic and dill on potatoes and carrots. The oil coating kept the potatoes from browning and they absorbed the flavors well. I cut up a big batch and refrigerated half to bake later, and it tasted just as good baked two days later as it had originally.
Non-Dairy Clam Chowder (or Not-Potato Soup)
New-England style clam chowder. It was one of those foods I thought I'd never enjoy again, at least for a very long time.
But, thanks to The Complete Food Allergy Cookbook: The Foods You've Always Loved Without the Ingredients You Can't Have, bought for me by DH, the impossible is happening fairly frequently around here.
This clam chowder is dairy, gluten, soy and nightshade free. It can be made without the clams for you vegans out there, too. (In that case, it's not clam chowder; it's mock potato soup.)
With no dairy and no nightshades, you can finally eat clam chowder again.
#####################
The book gives several variations on the recipe, including using other milk substitutes. I think next time I'll use a bit less onion, but I really enjoyed the soup.
I think I almost prefer the taste of cassava to that of a regular potato. It has a very similar taste and texture, but just slightly sweet and without that sort of sour flavor that potatoes sometimes have. It is, however, much tougher to cut up and takes longer to cook, and you have to be sure to remove all the little woody bits.
I like this food allergy cookbook. Rather than just giving recipes (although it has lots of those, too) the goal is to teach you to substitute and improvise so that you can alter existing recipes to meet your dietary needs. I highly recommend the book.
The information is truly helpful and fairly exhaustive, and almost every recipe I've tried so far has become one to add to the oft-repeated stash of favorites. There's also some helpful information about identifying and coping with food allergies in general.
The book tells you how to cook without the things you may need to avoid--including preservatives, animal products, dairy, eggs, soy, gluten, corn and other grains, sugar, nightshade plants, and even chocolate. The only area I noticed in which it is really lacking is that of tree nut and legume allergies; several of the recipes require either soy or some kind of tree nut (none call for peanuts), and cooking without tree nuts is not particularly discussed.
This cookbook has quickly become my most often-used cookbook. Especially the recipe for Universal Muffins--my kids and I love that one, and it's so very flexible. I make it sometimes several times a week.
But, thanks to The Complete Food Allergy Cookbook: The Foods You've Always Loved Without the Ingredients You Can't Have, bought for me by DH, the impossible is happening fairly frequently around here.
This clam chowder is dairy, gluten, soy and nightshade free. It can be made without the clams for you vegans out there, too. (In that case, it's not clam chowder; it's mock potato soup.)
With no dairy and no nightshades, you can finally eat clam chowder again.
#####################
Clam Chowder (From The Complete Food Allergy Cookbook, by Marilyn Gioannini)
1 hour * 4 servings
This classic New England style clam chowder, thick with "potatoes", onion, and "cream", tastes exactly like the real thing. The "potato" is yuca (cassava) root, available in most supermarkets; the "cream" is cashew milk.
Absolutely delicious!
About 1 lb. yuca root
1/8 tsp. salt
2 Tbs. vegetable oil
1 large onion, chopped
1/3 cup raw cashews
1 (6 1/2 oz) can minced clams with juice (check labels when shopping--some have preservatives)
salt and pepper
Peel yuca root and dice into 1/2 inch cubes. Cover generously with water, add salt, and bring to a boil in a medium saucepan. Simmer, covered, 30 to 40 minuts, or until very soft. Stir occasionally. While the yuca is cooking, heat vegetable oil in a medium skillet. Add chopped onion and saute until soft. Add the onion to the saucepan with the yuca root.
Put cashews into blender container. Blend briefly until they are broken up. Aded 1 1/2 cups of water and blend on high until cashews are completely pulverized, about 3 minutes. When the yuca is soft, add clams to the saucepan. Add cashew milk and heat just until hot. Serve immediately. Add salt and pepper to the bowl to taste, and serve with toast.
The book gives several variations on the recipe, including using other milk substitutes. I think next time I'll use a bit less onion, but I really enjoyed the soup.
I think I almost prefer the taste of cassava to that of a regular potato. It has a very similar taste and texture, but just slightly sweet and without that sort of sour flavor that potatoes sometimes have. It is, however, much tougher to cut up and takes longer to cook, and you have to be sure to remove all the little woody bits.
I like this food allergy cookbook. Rather than just giving recipes (although it has lots of those, too) the goal is to teach you to substitute and improvise so that you can alter existing recipes to meet your dietary needs. I highly recommend the book.
The information is truly helpful and fairly exhaustive, and almost every recipe I've tried so far has become one to add to the oft-repeated stash of favorites. There's also some helpful information about identifying and coping with food allergies in general.
The book tells you how to cook without the things you may need to avoid--including preservatives, animal products, dairy, eggs, soy, gluten, corn and other grains, sugar, nightshade plants, and even chocolate. The only area I noticed in which it is really lacking is that of tree nut and legume allergies; several of the recipes require either soy or some kind of tree nut (none call for peanuts), and cooking without tree nuts is not particularly discussed.
This cookbook has quickly become my most often-used cookbook. Especially the recipe for Universal Muffins--my kids and I love that one, and it's so very flexible. I make it sometimes several times a week.
Thursday, November 09, 2006
Root Vegetable Chips
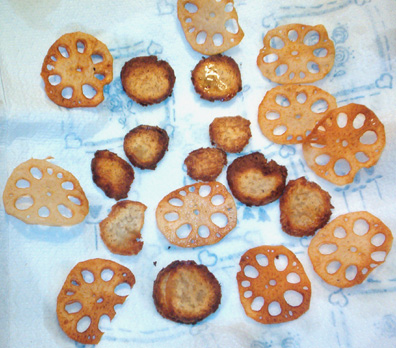
These non-potato chips are nightshade free and can be made free of any allergen by adjusting the type of root vegetable, oil and seasoning used. They are remarkably easy, and have a satisfying crunch and nice flavor.
You can use just about any root vegetable--parsnip, taro, and yam are some I've seen used. One I haven't seen used before is lotus root. It works very well, and as an added bonus the chips are very pretty to look at also.
I made some chips last night out of baked taro and raw lotus root, sliced thinly. The taro didn't work as well--perhaps because I sliced the chips too thickly and cooked them at too high a heat. Or possibly because I had baked the taro previously for fear of undercooking (taro root is not edible if not fully cooked, and can irritate hands and mouths if not handled raw).
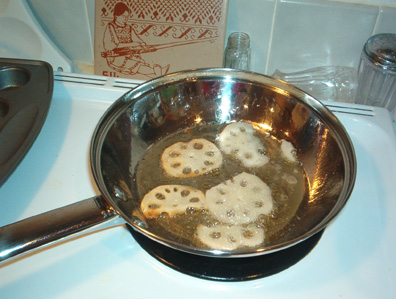
The lotus chips turned out beautifully. I peeled the lotus root and sliced it thinly. Then I heated about 1/4 inch of grapeseed oil in a stainless steel pan and fried the slices on both sides just until golden brown.
I started out with too high of a temperature initially, and they got a little too brown.

With the second batch I turned the heat down to about 4 on a scale of 1-10. They cooked more slowly, but ended up nicely crispy without getting burnt.
I forked them out onto a paper towel, which absorbed some of the extra grease. Then I sprinkled them with salt and we ate them.
Next time I think I'll try lightly coating them with oil and baking them in the oven.
Wednesday, November 08, 2006
Lotus Root

I've discovered a new food Baby E will eat and seems to tolerate well: lotus root.
########
It's the root of a flower, and the taste and texture are something akin to a cross between potato and water chestnut.

I think Baby E likes it because it has little holes to stick her fingers through.

It's a pretty vegetable, and interestingly different. So far I've tried adding it to a mixed stir-fry and simmering it in water.
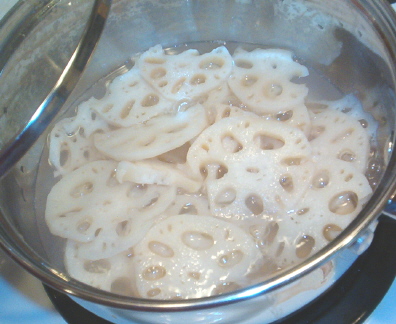
The stir-fry was more successful. I think it needs to be mixed with other flavors and textures to really shine.
Taro root can also be eaten raw in salads, but none of us were crazy about the taste and texture of it raw.
The only place I've found it so far is at Whole Foods.
Saturday, October 28, 2006
Pumpkin Spice Muffins (free of gluten & most allergens)
This is a recipe I came up with tonight to use some of our pumpkin bounty. These muffins are egg-free, gluten-free, corn-free, vegan and non-dairy. The flaxseed takes the place of eggs and oil.
The flavor and texture are quite good, but slightly too sweet for my taste. I might try it with 1/3 cup of honey next time, adding a tablespoon or two of water if needed.
You could substitute 1 cup of any kind of gluten-free flour for the rice flour, or 2 cups of gluten-containing flour for the rice and tapioca flours. Sweet or glutinous rice flour should work as a substitute for the tapioca flour.
Brown rice syrup, agave nectar, or another sweetener should be substituted for the honey if you will be feeding the muffins to a child under 1 year of age. It's debatable whether baking destroys any potential botulism spores in honey.
If you want less of a pumpkin pie/gingerbread flavor, you can leave out some of the spices and just include the cinnamon.
Preheat oven to 350 degrees and grease muffin pan.
Blend dry ingredients:
1 cup brown rice flour
1 cup tapioca flour
3/4 tsp cream of tartar (substitute 2 tsp lemon juice or apple cider vinegar added to the wet ingredients if allergic to grapes)
1 tsp baking soda
1/4 tsp salt
1 1/2 tsp cinnamon
1/2 tsp nutmeg
1/4 tsp ginger
1/4 tsp allspice (can substitute cloves)
Beat together:
1/2 cup honey
1 Tbs ground flax seed, mixed with 3 Tbs hot water and cooked until gelled (you can whip this when cooled to give the muffins more lift, if desired)
Add to honey mixture:
1 1/4 cups pumpkin puree, or 1 cup mashed or canned pumpkin plus 1/4 cup water
Quickly mix honey/pumpkin mixture into dry ingredients, stirring just until there are no large lumps
Fill muffin tins 3/4 full and bake at 350 degrees for 30-35 minutes.
Makes 12 muffins.
Friday, October 27, 2006
Cream Cheese Icing
Here's a cream cheese frosting recipe that's egg free, free of refined sugars and corn-free if you leave out the vanilla or use corn-safe flavoring.
From Desserts by Sue Gregg (Eating Better Cookbooks)
From Desserts by Sue Gregg (Eating Better Cookbooks)
Icing:
Blend together until smooth and frost completely cooled cookies or cake with:
4 oz cream cheese
1/4 cup plain nonfat yogurt
1 tablespoon honey
1/2 teaspoon lemon juice
1/2 teaspoon vanilla
Banana Sweet Potato Frosting
This icing recipe is from Bridget at Never Here Again. It's egg-free, dairy-free, corn-free and free of refined sugars--hard to find in a frosting recipe!
Mix together:
1 cup mashed sweet potato
1 ripe banana (could also use amasake)
2 T maple syrup or brown rice syrup
1 t orange juice
We can't have sweet potato or maple syrup, so if anyone tries this please let me know how it is.
Mix together:
1 cup mashed sweet potato
1 ripe banana (could also use amasake)
2 T maple syrup or brown rice syrup
1 t orange juice
We can't have sweet potato or maple syrup, so if anyone tries this please let me know how it is.
Carrot-Pineapple Cake
I was supposed to bring a dessert to an event a few weeks ago, so I made this carrot cake. It's pretty healthy and free of our allergens. I even gave my kids some for breakfast the next morning.
Everyone loved the cake and wanted the recipe.
I substituted orange juice for the vanilla, or you could just leave the vanilla out to make it corn-free.
I didn't have crushed pineapple, and my can of pineapple was 24 oz. in chunks, so I just drained the chunks and put them in my food processor to crush them. I put in the whole can even though it was a little more than the recipe called for. Then the batter didn't seem quite moist enough, so I added just a bit of the pineapple juice to it.
I used King Arthur's "White" Whole Wheat Flour, and left out the walnuts.
Everyone loved the cake and wanted the recipe.
Carrot Cake
recipe from Desserts by Sue Gregg (Eating Better Cookbooks)
"Light, tender, moist, and not too sweet."
################################
Preheat oven to 350 degrees.
Grease 9" x 13" or bundt pan
Cream together:
1/2 cup butter (1 stick)
3/4 cup honey
Blend in:
4 eggs
1 teaspoon vanilla
3 cups shredded carrot
1 to 1 1/4 cups crushed pineapple, drained (I used pineapple in its own juice)
Blend dry ingredients thoroughly in separate bowl:
2 1/2 cups whole wheat pastry flour
2 teaspoons baking soda
1 teaspoon cinnamon
3/4 teaspoon salt
Thoroughly blend dry ingredients into creamed ingredients
Mix in:
1 cup chopped walnuts (optional)
1 cup raisins (optional)
Pour into greased pan and bake 35 to 45 minutes, until knife comes clean out of center.
Cool for 10 minutes before removing from pan.
Cool thoroughly before frosting. . . .
Makes 18 to 24 servings.
I substituted orange juice for the vanilla, or you could just leave the vanilla out to make it corn-free.
I didn't have crushed pineapple, and my can of pineapple was 24 oz. in chunks, so I just drained the chunks and put them in my food processor to crush them. I put in the whole can even though it was a little more than the recipe called for. Then the batter didn't seem quite moist enough, so I added just a bit of the pineapple juice to it.
I used King Arthur's "White" Whole Wheat Flour, and left out the walnuts.
Basic Stir-fry
Stir fry is one of the easiest and most flexible foods to make. It's really hard to ruin; you just put in random amounts of various vegetables, add a protein of some sort if desired (meat, cooked or canned beans, or chickpeas work well), fry a bit, and serve.
Or, you can take the same mixture of vegetables and throw them in a steamer for 5 or 10 minutes. Steaming gives a different flavor and texture, but is also good.
I don't own a wok, so I just use a frying pan for my stir-fry.
If I'm using meat in the stir-fry I like to toast my garlic and onion in a bit of oil the pan first so the meat picks up some of the flavor. Then I remove the garlic and onion to another dish and fry the meat, adding the garlic and onion back in with the other veggies. You can leave out the onion, garlic and oil if you need or want to; they're not really necessary at all.
Incidentally, if you use much garlic a decent garlic press is definitely worth the $5 or $10 investment. I use mine all the time. It's so much faster than mincing garlic with a knife. The trick is to rinse the mashed garlic out of the press before you put it in the dishwasher, or it will be hard to get clean.
While the meat is cooking I wash and cut up vegetables, stirring the meat frequently. I do the firmest vegetables first, because they take longest to cook.
When the meat is almost or barely done cooking, I start adding vegetables as I cut them up. I'll put in hard things like carrots, potatoes, turnips and parsnips first if I've cut them into chunks or slices. If they're grated, you can add them at the same time as the softer vegetables and they will cook faster.
In general, I add the hardest vegetables first and the most delicate vegetables last. Something like lettuce, corn or peas takes very little time to cook, so it will go in just before serving. You can throw in any leftover cooked vegetables at this time, too, and just heat them before serving.
If you are using tofu or cooked legumes, you'll want to add them with the soft vegetables or at the end of cooking so they don't get overcooked and broken up.
Kale, although it is a leafy vegetable, takes longer to cook so you'll want to add it earlier. I usually blanch broccoli for 1-2 minutes in boiling water before adding it to a stir-fry; it has a better color and texture that way, and cooks faster.
I often cover my stir-fry with a lid or some aluminum foil to help hold in the heat so it cooks more quickly and evenly. Stir frequently so the veggies don't burn. Cook just until the veggies are starting to get tender and brown a bit on the edges.
Most vegetables have quite a lot of flavor, so extra seasonings really aren't necessary, although you can add them if you like. I usually use just salt, maybe a dash of pepper, and sometimes some sesame oil.
Last night I made a stir-fry with a minced clove of garlic, about half a leek, a pound of ground veal, 4 or 5 smallish carrots, 3 stalks of celery, 4 leaves of kale, and a zucchini, all sliced thin and added in that order. It was delicious.
Other vegetables that are good in a stir-fry include turnip, jicama, parsely, cabbage, bok choy, mushrooms, corn, tomatoes, cooked beet, green beans, yellow squash, peppers, eggplant, cauliflower, cooked cassava/yuca, bean sprouts, lettuce or just about any vegetable you enjoy and can tolerate. Some fruits such as apples or citrus fruits add a really nice touch to a stir-fry, too.
You can serve a stir-fry over some kind of a starch or grain (noodles, spaghetti squash, rice, cubed bread, any cooked grain, or a mashed root vegetable such as potato) if you want to. Or, as we did last night, you can simply eat the stir-fry by itself.
It's a great thing for someone who doesn't cook much to try making, because it's such a simple and flexible dish.
A basic rule of thumb if you're making a stir-fry for the first time might be to choose 5 ingredients or fewer in addition to your protein and seasonings. Don't make it too complicated for yourself at first. If you add too many different things and cook it to long, you can end up muddying the flavors. It will probably still be good, but keeping things simple seems to make it even better.
Sunday, October 22, 2006
Gingerbread Cookies
This gingerbread cookie recipe was a big hit at a recent birthday party we attended. Several children ate their cookies and left the cake and ice cream nearly untouched. With whole foods and no refined sugars, these cookies are a great choice.
I did use slightly more honey than the recipe called for . . . maybe a tablespoon more. My cookies were a little too sticky to roll out, so I had to add a little extra flour and dust the rolling pin and rolling surface with an extra-thick layer of flour.
I used King Arthur's White Whole Wheat Flour. King Arthur and Gold Medal seem to be the most corn-free of the widely available commercial flours.
I made just half the batch and it made 2-3 dozen cookies.
The cookies could be made non-dairy by substituting another fat for the butter. I like to use palm kernel or coconut oil to substitute for solid oils (like butter, margarine, shortening) because they are non-hydrogenated oils that are solid at room temperature.
There is a recipe for icing, but I didn't try it . . . it contains a lot of dairy products. We used a different frosting.
I would suggest dried fruit, nuts and puffed grains as decorations instead of candy.
I did use slightly more honey than the recipe called for . . . maybe a tablespoon more. My cookies were a little too sticky to roll out, so I had to add a little extra flour and dust the rolling pin and rolling surface with an extra-thick layer of flour.
I used King Arthur's White Whole Wheat Flour. King Arthur and Gold Medal seem to be the most corn-free of the widely available commercial flours.
I made just half the batch and it made 2-3 dozen cookies.
Gingerbread People
From Desserts by Sue Gregg (Eating Better Cookbooks)
"A special holiday cookie. Children will especially enjoy making these."
Cream together:
1/2 cup soft butter
1 cup molasses, unsulfured or blackstrap (molasses may be problematic for some people who are highly sensitive to excitotoxins)
2 Tablespoons honey
Beat in:
4 eggs
Blend together in separate bowl:
4 cups whole wheat flour or whole wheat pastry flour
3 teaspoons baking soda
1 1/2 teaspoons ginger
1 teaspoon allspice
1 teaspoon cinnamon
1/2 teaspoon nutmeg
1/2 teaspoon cloves
Mix dry ingredients into creamed mixture thoroughly but do not overmix.
Wrap in wax paper and chill for 1 hour.
Roll dough small amounts at a time 1/8" to 1/4" thick. Cut dough with gingerbread cookie cutter.
Bake on greased cookie sheet at 350 degrees for 10 to 12 minutes.
Ice when completely cooled, and decorate with raisins and red hots.
The cookies could be made non-dairy by substituting another fat for the butter. I like to use palm kernel or coconut oil to substitute for solid oils (like butter, margarine, shortening) because they are non-hydrogenated oils that are solid at room temperature.
There is a recipe for icing, but I didn't try it . . . it contains a lot of dairy products. We used a different frosting.
I would suggest dried fruit, nuts and puffed grains as decorations instead of candy.
Saturday, October 21, 2006
Hypoallergenic Fruit Waffles or Pancakes

This is an original (and I think rather unique) recipe I created today. I'm still tweaking it quite a bit, so please do share your comments, experiences and variations.
This recipe is completely free of all common allergens as well as being gluten-free and vegan. The baking soda reacts with the slight acidity of the fruit to provide leavening, so no baking powder or other acid is necessary. The flax seed takes the place of both eggs and oil. I made my waffles with water, but substituting fruit juice would give them a stronger and sweeter flavor.
You can, of course, substitute types of flour and fruit freely for different tastes. Just use any combination of flours to make a total 1 cup of flour per batch. A gluten-containing flour will probably rise more than rice or other gluten-free flour will. With the gluten-free recipe you'll want to fill your waffle iron or other container almost full, as it rises just a little.
Basic Fruit Quick Bread
Mix together and set aside:
2 Tbs. flaxseed meal (ground flax seed)
1/4 cup very hot water
In large bowl combine:
1/4 cup sweet rice flour
3/4 cup brown rice flour
3/4 teaspoon baking soda (a.k.a. sodium bicarbonate or bicarbonate of soda)
1/8 teaspoon unrefined sea salt (additive-free salt--no iodine added!--is a must if you're allergic to corn)
To dry ingredients, add
1 cup fruit puree * or all-natural applesauce
Flaxseed mixture
1/4 to 1/2 cup water or fruit juice
Mix just until blended. Bake in waffle iron.
Makes about 2 large waffles or 4 small waffles. These are dense and filling.
* The amount of fruit puree does not have to be quite exact. You'll want to adjust the amount of added liquid accordingly.
To make fruit puree: core and (if desired) peel a large pear and puree in blender with 1/4 cup water or fruit juice or amount needed to process. Slicing the fruit before processing helps the blender work better. You can also use other fruits (apple or banana work well) or a combination of fruits.
Suggested add-ins: 1 tsp-1 Tbs honey or other sweetener, 1/4-1/2 tsp. spice such as cinnamon, ginger, or nutmeg.
Notes:
If you are not greasing your waffle iron in any way, you'll probably do better to use the lesser amount of water listed, as the batter sticks less if it's stiffer. Just heap it onto the waffle iron with a spoon. My waffle iron takes about a cup of batter to fill it.
For a fluffier waffle, cook the 2 tbs. flaxseed with 1/4 cup water until gelled, then cool to room or refrigerator temperature and whip as you would egg whites (you can add 1/8 cup (3 Tbs) more water if needed). It won't beat up like egg whites, but it will retain some air bubbles and get a bit fluffy.
If you use a gluten-containing flour and are going to grease the waffle iron, try cutting the flaxseed meal down to 1 Tablespoon in 1/4 cup of hot water. You can use the smaller amount of flax with the rice flour, too--it still works, but yields a batter that is a little more grainy.
To make other breads:
For pancakes, simply add more water to reach desired consistency and fry in nonstick pan.
I expect this recipe could be baked in muffin tins or a bread pan as well, but I haven't figured out the temperature and time exactly yet.
Friday, October 20, 2006
Banana Waffles

This recipe is from one of my favorite cookbooks . . . a two-volume set I picked up at a little antique shop. Originally printed in 1947, mine is from the 9th printing--Dec 1957. Meta Given's Modern Encyclopedia of Cooking.
It has a lot of great recipes in it you won't find elsewhere--everything from baked quinces to stewed possum.
Banana Waffles
2 cups all-purpose flour
3 tsp D.A. baking powder (or 3 1/2 tsp tartrate or phosphate type)--make sure your baking powder is safe for your dietary restrictions, or use a substitite.
1 Tbs sugar
3/4 tsp salt
3 eggs
1 and 1/2 cups milk
1/3 cup oil or melted butter
1 cup mashed ripe bananas (2 bananas)
Sift flour, measure and resift 3 times with remaining dry ingredients.
Beat eggs, add milk and shortening. Pour into dry ingredients, add bananas and beat until smooth.
Use 1/2 cup batter for each waffle. Bake in a hot waffle iron until golden brown. Serve immediately with butter and hot syrup.
Makes six 7-inch waffles.
It's a pretty foolproof recipe. I substitute freely (non-dairy milk, various kinds of flour, oil instead of the melted shortening called for in the original recipe) and don't bother with the sifting part (just stir dry ingredients together and use a hand-mixer to blend in the wet ones).
For real decadence, add safe chocolate chips!
Be sure to use corn-free baking powder if you're allergic to corn.
If you want the waffles really fluffy, separate the eggs, beat the whites and fold them in last. I haven't yet tried substituting anything for the eggs, but I plan to try it soon with ground flaxseed instead of eggs.
Thursday, October 19, 2006
Eggless Banana Bread
The girls and I have made this banana bread quite a few times. My 4- and 5-year-olds are able to do much of it themselves, with a little help. The 1-year-old likes to watch and help eat it.
The recipe is from a 1970's Sesame Street Library book, Volume 14.
The bread is dense, very sweet and a little gooey. It holds together quite well even without eggs, because the bananas and the honey are so sticky.
I used a silicone bread pan, which turned out a beautiful loaf with no need to grease the pan.
The honey we used was orange blossom honey, which gave it a very nice and slightly fruity flavor (and also cuts down on the chances of their being any corn pollen or nectar in the honey).
If you substituted oil for the butter, it could be a completely vegan recipe, and other types of flour could easily be substituted to make it gluten-free.
The girls absolutely love it, and M&M literally cried when it was gone last time. We shared a few slices with the neighbors and ate up the rest within minutes.
The recipe is from a 1970's Sesame Street Library book, Volume 14.
Big Bird's Banana Bread
Here is what you will need:
3 peeled ripe bananas
3/4 cup honey
1/4 cup melted butter
1/2 teaspoon baking soda
1 1/2 cup whole wheat flour
1 big bowl
1 big wooden spoon
1 fork
1 bread pan (rub some cooking oil around the inside of it)
1 wire cooling rack
1 measuring cup
1 set of measuring of spoons
##################
Here's what you need a grown up to do:
1. Turn the oven on to 350 degrees.
2. Melt 1/4 cup of butter in a pan.
Here's what you do:
1. Put the peeled bananas in a bowl.
2. Mash up the bananas with the back of a fork.
3. Add the melted butter.
4. Add 1/2 teaspoon baking soda, 1 1/2 cups whole wheat flour, 3/4 cup honey.
5. Stir everything in the bowl with the big spoon. Stir until everything is mixed together.
6. Pour the mix into the oiled bread pan.
7. Bake for 1 hour.
8. After 1 hour, put a toothpick in the bread. Is there some bread on the toothpick when you pull it out? If there is, let the bread cook for a little while longer. If there is no bread on the toothpick when you pull it out, the bread is done! Ask your grown up helper to take the bread out of the oven. They need to take the bread out of the pan and put it on the wire rack.
10. When the bread is cool, cut it up and share it with your neighbors!
The bread is dense, very sweet and a little gooey. It holds together quite well even without eggs, because the bananas and the honey are so sticky.
I used a silicone bread pan, which turned out a beautiful loaf with no need to grease the pan.
The honey we used was orange blossom honey, which gave it a very nice and slightly fruity flavor (and also cuts down on the chances of their being any corn pollen or nectar in the honey).
If you substituted oil for the butter, it could be a completely vegan recipe, and other types of flour could easily be substituted to make it gluten-free.
The girls absolutely love it, and M&M literally cried when it was gone last time. We shared a few slices with the neighbors and ate up the rest within minutes.
Tuesday, October 17, 2006
Breakfast Banana Splits or Apple Surprise
Even my child going through the "I-don't-like-anything" stage loves to eat this for breakfast. I also serve it as a lunch, snack or dessert.
Breakfast Banana Splits
Put a banana, cut in half the long way, into a bowl. Spoon plain yogurt on top. Layer on fresh or canned fruit, if desired.
Drizzle honey, maple syrup or other sweetener over the mixture (optional). Add a small handful of uncooked rolled oats (quinoa flakes or puffed millet would work well for a gluten-free version). This is good topped with a sprinkling of chopped nuts or seeds if you can tolerate them.
You can combine all different types of ingredients for this, just like for a sundae.
For instance, you can turn it into Apple Surprise this way:
Substitute a fresh grated apple or pear for the banana. Soak 2-4 tablespoons of grain flakes in about twice the quantity of water (cold water overnight, or boiling water for 2-5 minutes), then mix it all together with 2 tablespoons of yogurt and a teaspoon of honey.
Add other fruit or berries if desired. Top with chopped nuts (I like roasted almonds) or puffed grain such as rice, amaranth or millet.
To make the Apple Surprise non-dairy, you can substitute rice milk or rice yogurt for the yogurt. If you can tolerate soy, silken tofu or soy yogurt would probably work as well.
I use Trader Joe's plain yogurt. The only ingredients are milk and active cultures. My corn-allergic daughter can tolerate the cow's milk yogurt but not the goat milk yogurt (the goats are fed corn). Brown Cow brand yogurt contains fruit-derived pectin and seems to be corn-safe (but avoid pectin if you're allergic to apples!).
The possible combinations are endless. Use your imagination!
Monday, October 16, 2006
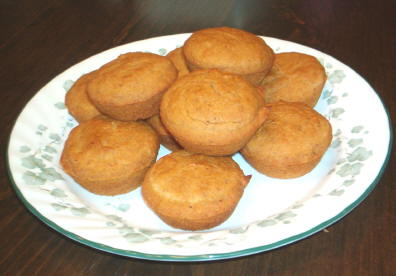
Pumpkin Muffins
All three of my kids devoured these muffins and asked for more. They are really good--moist, flavorful but not too spicy, and tasty but not too sweet.
I had already pureed my baked pumpkin with enough water to make it work in the blender. So instead of using mashed pumpkin and water, I just used pumpkin puree without adding water. Since I was substituting rolled oats for the nuts, I put in 1 1/3 cup of pumpkin puree--oats absorb more liquid than nuts do.
I heaped the measuring spoon on the cinnamon a bit and put in just a bit less nutmeg than it called for--maybe 1/4 teaspoon less--to cater to my family's tastes.
I baked them in a mini bundt pan instead of a muffin tin, so the recipe made 6 baby bundt cakes. They really did pull off the sides of the pan with a tug as the recipe said. I tipped them on their sides to allow steam to escape while they cooled, so they wouldn't get soggy.
Then I refrigerated them in zippered plastic bags and reheated them for breakfast this morning. They were quite good reheated. I think they would freeze well, too.
The muffins are fabulous. We ate the entire batch, and I'm going to have to make a double batch next time if I want any to freeze.
Pumpkin Gems
from Soups & Muffins by Sue Gregg (Eating Better Cookbooks)
"These are great for snack or dessert as well as for meals. Good hot or cold."
###########################
AMOUNT: 10 large or 12 medium
Oven: 350 degrees preheated
Bake: 20 to 25 minutes
1. Spray muffin pan with no-stick cooking spray (or grease with oil or shortening--I used non-hydrogenated palm kernel oil shortening)
2. Blend together thoroughly with wire whisk in large mixing bowl:
1 egg (or 2 egg whites, or 1/4 cup egg substitite)
1/3 cup honey (you could substitute another sweetener)
3. Blend in:
1 cup mashed pumpkin
1/4 cup water
4. Blend dry ingredients together in separate bowl
2 cups whole wheat flour (or whatever type of flour you prefer--you may need to adjust liquid amounts for other types)
1 1/2 teaspoons baking powder
1 1/2 teaspoons cinnamon
1 1/2 teaspoons nutmeg
1/2 teaspoon baking soda
1/2 teaspoon salt
1/2 cup chopped walnuts (I substituted rolled oats and added a bit more liquid)
5. Blend dry ingredients into liquid ingredients just until mixed. Do not overmix!
5. Fill muffin cups almost full. Fill any empty cups half full of water.
7. Bake at 35 degrees for 20 minutes.
8. Cool muffins in pan for 5 to 10 minutes for easy removal with slight tug on side of each muffin.
I had already pureed my baked pumpkin with enough water to make it work in the blender. So instead of using mashed pumpkin and water, I just used pumpkin puree without adding water. Since I was substituting rolled oats for the nuts, I put in 1 1/3 cup of pumpkin puree--oats absorb more liquid than nuts do.
I heaped the measuring spoon on the cinnamon a bit and put in just a bit less nutmeg than it called for--maybe 1/4 teaspoon less--to cater to my family's tastes.
I baked them in a mini bundt pan instead of a muffin tin, so the recipe made 6 baby bundt cakes. They really did pull off the sides of the pan with a tug as the recipe said. I tipped them on their sides to allow steam to escape while they cooled, so they wouldn't get soggy.
Then I refrigerated them in zippered plastic bags and reheated them for breakfast this morning. They were quite good reheated. I think they would freeze well, too.
The muffins are fabulous. We ate the entire batch, and I'm going to have to make a double batch next time if I want any to freeze.
Friday, October 13, 2006
Brown Sugar Cake
This brown sugar cake is a recipe from Tastes of Country, a cookbook by Frances A. Gillette. Almost every recipe I've tried from this cookbook has been fabulous--I highly recommend it if you can get your hands on a copy.
I sometimes cut down on the sugar a bit, and I always substitute rice milk for the milk. C & H brand brown sugar seems to be corn-free, and if you can't find corn-free vanilla you could substitute maple syrup or just leave it out.
Whole-wheat or an alternative flour could be used in this recipe. Depending on your needs, you could probably substitute shortening, margarine or oil for the butter and still get decent results.
This cake is wonderful by itself or with frosting, ice cream or whipped topping.
Quick Cake
A rich brown sugar taste. Rose Merne makes this cake often.
1/2 cup softened butter
1 1/4 cups brown sugar
2 eggs
1/2 cup milk
1 2/3 cups flour
3 tsp. baking powder (info. on safe baking powder )
1 tsp. vanilla
Put ingredients into bowl in order given and do not stir until all have been added. Beat 3 minutes. Bake in buttered pan for 35-45 minutes at 350 degrees. Nuts or raisins may be added, if desired.
I sometimes cut down on the sugar a bit, and I always substitute rice milk for the milk. C & H brand brown sugar seems to be corn-free, and if you can't find corn-free vanilla you could substitute maple syrup or just leave it out.
Whole-wheat or an alternative flour could be used in this recipe. Depending on your needs, you could probably substitute shortening, margarine or oil for the butter and still get decent results.
This cake is wonderful by itself or with frosting, ice cream or whipped topping.
Swope Bread
If you like homemade bread but don't have time to wait for yeast bread to rise, try this recipe I discovered on the back of a Bob's Red Mill flour sack. It's yeast-free, but breadlike enough to make sandwiches.
If you make it with brown or turbinado sugar, it has a sweet, nutty flavor slightly akin to the flavor of Raisin Bran without the raisins (although it would be quite good with raisins added!). It's very nice toasted, with butter and honey on it.
I substitute rice milk soured with a bit of lemon juice for the buttermilk. You can do the same thing with regular milk--put in about a tablespoon of lemon juice or apple cider vinegar per cup of buttermilk you need and fill up the rest with milk or your milk substitute. Use whatever type of flour is safe for you--I use King Arthur whole wheat, and King Arthur white whole wheat flour instead of the BRM flour.
Be careful when you mix the baking soda with the acidic milk--it will foam up!
Note: Corn-allergic readers, please be aware that some have complained about higher-than-usual incidence of corn cross-contamination with Bob's Red Mill products.
If you make it with brown or turbinado sugar, it has a sweet, nutty flavor slightly akin to the flavor of Raisin Bran without the raisins (although it would be quite good with raisins added!). It's very nice toasted, with butter and honey on it.
A long-time customer of Bob's Red Mill Natural Foods shares her "so easy it's laughable" recipe with us. It makes wonderful bread for toast. She calls it:
Swope Bread
4 cups Bob's Red Mill stone ground whole wheat flour
2 cups Bob's Red Mill unbleached white flour
1/2 cup sugar
2 tsp. salt
1 quart buttermilk
4 tsp baking soda
2 bread pans, greased
Preheat oven to 375° F. In a large mixing bowl mix first 4 ingredients. In a separate bowl mix baking soda and buttermilk. Stir wet ingredients into dry. Pour into bread pans and smooth tops of loaves. Place in center of oven. Turn oven down to 350° and bake approximately 50 minutes. Turn out and cool on wire rack.
I substitute rice milk soured with a bit of lemon juice for the buttermilk. You can do the same thing with regular milk--put in about a tablespoon of lemon juice or apple cider vinegar per cup of buttermilk you need and fill up the rest with milk or your milk substitute. Use whatever type of flour is safe for you--I use King Arthur whole wheat, and King Arthur white whole wheat flour instead of the BRM flour.
Be careful when you mix the baking soda with the acidic milk--it will foam up!
Note: Corn-allergic readers, please be aware that some have complained about higher-than-usual incidence of corn cross-contamination with Bob's Red Mill products.
Simple Soup Stock
Broth or stock is the basic ingredient in soup making, and is also used in many recipes.
You can, of course, make a soup with just water and your soup ingredients. In most recipes, you can simply substitute water (and salt, if desired) for the broth called for. Or, for a meaty-tasting vegan option, add a tablespoon or more of nutritional yeast.
That works just fine, despite what the bouillon cube and soup stock manufacturers would have you believe. Most commercial bouillon or soup stock is mostly water and salt, anyway.
But for an extra nice, rich flavor boost to your soup, you can easily make your own soup stock.
The very easiest way to make stock is to simply take the leftover liquid from cooking meat or vegetables and condense it. You can add salt and other seasonings if you like, or just use the liquid as is.
Condensing the stock is easy. Just put the liquid into a pot and simmer it slowly with the lid off until it's half or less of its original volume. The more the water evaporates, the more condensed and stronger-flavored your stock will be.
This will take several hours, so you can just leave it to simmer while you're doing other things. I usually set my burner at 1 or 2 on a scale of 10 for this. As long as the broth level isn't getting too low, I've even gone to sleep or left the house while broth is simmering on a back burner of my electric stove. A flat-topped woodburning stove is great for simmering things over a long period of time, too.
Once it's condensed enough for your tastes, take the pan off the burner and let it cool. If it's a meat-based broth, you'll probably want to chill the stock and scrape the fat off the top before doing anything else with it. The fat can be saved and used as your oil or shortening in cooking later.
I like to freeze my condensed broth into ice cube trays to use as a substitute for bouillon cubes. After the cubes freeze, I store them in a labeled container and can take out exactly the quantity I need for use in recipes.
Remember that the flavor will be stronger than the original broth, so you'll most likely want to add water if the recipe calls for broth or soup stock instead of boullion. I usually use between 1 and 3 cubes per cup of water.
I like to cook chicken by covering it with water and simmering it until done, so I usually condense and use the water and juices left in the pan this way. Sometimes I do it right away just by leaving the pan on the stove after I remove the chicken. Other times I put it the broth in the refrigerator for a day or so until I get a chance to condense it.
You can make an even more flavorful broth from scratch.
The basic idea is that you simmer meat and/or vegetables in a quantity of water until the flavor and many of the nutritional qualities of the other ingredients have seeped into the water. You can use just about any combination of one or more ingredients for this. Many people like to keep a container in their freezer and dump leftover bits of meat and/or veggies into it until it's full, and then use that to make their soup.
If you are starting a meat-based broth from scratch, it's nice to use the bones if you have them. You can roast them in the oven at 375 or so until browned for a richer flavor, if you like, but that's not necessary.
If possible, it's a good idea to crack or break the bones to allow the calcium to escape into the broth. If you're buying soup bones from the butcher, ask to have them cracked or cut up. Adding a teaspoon or two of apple cider vinegar will help draw the calcium from the bones into your broth.
Put the bones and/or meat into the pan and add enough water to cover them with at least a half-inch of water over the bones. Then add the vinegar, if desired, and whatever spices you want. Anything other than the meat or bones and water is completely optional.
For most broths you can add some salt (I use unrefined sea salt) at the beginning if desired. If you are cooking legumes (beans or dried peas) the salt will make them tough, so you'll want to add any salt toward the end of cooking.
All you do is bring the water to a gentle boil, then turn it down to a simmer so that it's just barely or almost boiling. You want to simmer it for at least an hour or two, but the longer you simmer it the stronger the flavor. Any longer than 12 to 24 hours, though, and you're going to start getting a bitter flavor and degenerating quality. I recommend 1 to 4 hours for vegetable stock and 2 to 8 hours for meat broths.
You may need to add water occasionally to keep the bones or vegetables covered during cooking.
Once you think you've simmered it long enough to get most of the flavor out of the ingredients, remove the meat or vegetables from the water. You can taste them to see if they're getting rather flavorless; if they are it's time to take them out. If you want to use them in a soup, you'll want to cook the broth for a shorter amount of time so that the meat or vegetables still have some flavor.
Now you may want to strain your broth to get out any chunks. Straining is optional, but because you're cooking this for so long, any chunks will not have much flavor by the time you eat them. If you have shards of bone in your broth, straining is not optional. You don't want bone slivers in your soup.
Next, return the liquid to the pot and condense it as described above.
This broth is healthier and much cheaper than anything you'd buy at the store.
Baking Powder and Substitutes
Here are several ways to make baked goods rise without using corn or other allergens, with hypoallergenic baking powder or other substitutes:
I believe you can also use tapioca flour, potato flour, or another kind of starch instead of the arrowroot.
Or you can just leave out the starch altogether and substitute 1/2 tsp. cream of tartar and 1/4 tsp. baking soda for each teaspoon of baking power called for in the recipe.
If you are allergic to grapes or glutamates, you should be aware that cream of tartar (a.k.a tartaric acid) is a grape-derived acid salt that is a byproduct of the fermentation in wine-making.
You can often substitute vinegar (but not white vinegar if you're allergic to corn) , lemon juice or any other edible acid for cream of tartar in recipes. You'd use 3 parts vinegar or fresh lemon juice to substitute for 1 part cream of tartar, and would probably need to lessen the amount of other liquids in the recipe accordingly.
Corn-Free Baking Powder from The Complete Food Allergy Cookbook by Marilyn Gioannini
"It is easy and economical to make your own baking powder. The basic ingredients are cream of tartar and baking soda. Cream of tartar is an acid, and baking soda is a base, and when they are mixed with liquid, bubbles form. Arrowroot powder is added to help keep it free-flowing. If the mixture cakes, mash it with your finger in the measuring spoon.
"To make your own corn=free baking powder, mix together 2 parts cream of tartar, 1 part baking soda, and 2 parts arrowroot powder. Store in an airtight container, and substitute in any recipe calling for baking powder. It is more economical to buy cream of tartar and arrowroot powder at a natural foods store, especially if they are sold in bulk.
"This is a single-acting baking powder. That is, all of the rising occurs as soon as the liquid is added to the dry ingredients. For best results, mix all of the dry ingredients well, mix the wet ingredients separately, and have the pan and oven ready to go before mixing them together. Keep mixing to a minimum."
I believe you can also use tapioca flour, potato flour, or another kind of starch instead of the arrowroot.
Or you can just leave out the starch altogether and substitute 1/2 tsp. cream of tartar and 1/4 tsp. baking soda for each teaspoon of baking power called for in the recipe.
If you are allergic to grapes or glutamates, you should be aware that cream of tartar (a.k.a tartaric acid) is a grape-derived acid salt that is a byproduct of the fermentation in wine-making.
You can often substitute vinegar (but not white vinegar if you're allergic to corn) , lemon juice or any other edible acid for cream of tartar in recipes. You'd use 3 parts vinegar or fresh lemon juice to substitute for 1 part cream of tartar, and would probably need to lessen the amount of other liquids in the recipe accordingly.
Thursday, October 12, 2006
Why this blog, and who is Purple_Kangaroo?
I like to cook, and I tend to be a bit of a gourmet.
Unfortunately, I come from a family with extensive food (as well as environmental) allergies and intolerances. That's given me a lot of experience creating and modifying recipes to be appropriate for special diets free of various allergens, sodium, yeast-feeding foods, and other elements.
I really enjoy being creative in the kitchen. Writing a food blog for me is a challenge, as I rarely actually measure anything and tend to throw in "a little of this, and a little of that" and find it difficult to remember or duplicate a dish later unless I write it down right away. So keeping the blog is partly for myself--a reminder to write down what I did when we liked a recipe so that I can duplicate (or at least approximate) it again in the future.
It's very difficult to find resources and recipes for dealing with food allergies, especially to foods other than the top 8 allergens. Since I started this blog, we've gone through some changes in the way we eat, which will be reflected in the recipes from each time period.
I had to learn to be creative to a whole new level for the sake of my highly allergic third child, Baby E. She was very sensitive to corn and soy, and also did not digest sugars (especially fructose) well. She has grown out of all but a mild dietary fructose intolerance (she has trouble digesting large amounts of apples or fresh pears, which have a high fructose-to-glucose ratio).
For a brief period of time Baby E and I were on an elimination diet which her doctor recommended, starting with only chicken, rice, bananas, broccoli and pears (ironically enough, the pears later turned out to be a problematic food because of the high fructose-to-glucose ratio), and then adding and subtracting foods trying to figure out which foods were problematic for her. So there are several recipes here with very limited ingredients.
My oldest child and I are lactose-intolerant, so while we can tolerate some foods like butter, raw goat milk and small amounts of yogurt or kefir, most of the recipes here tend to avoid large amounts of dairy products.
Currently I avoid excititoxins (quite an extensive list of ingredients that includes MSG, modified food starch, "natural flavors", artificial sugars, and prepackaged foods like canned soups, as well as foods naturally very high in aspartates and glutamates such as peanuts, brewer's yeast, seaweed and soy). I am on the sensitive end of the excitotoxin spectrum, but since even natural foods can contain some level of excitotoxins you will have to use your own judgment about whether the recipes are safe for you or not.
Most of the foods we eat are free of refined sugars, refined bleached grains, and artificial or processed foods. In general, most recipes posted here will be corn-free, soy-free and often dairy-free. Many of the recipes here are also free of nightshades, gluten, legumes, dairy, and other common allergens. Some of them are Nourishing Traditions-style recipes (tagged NT-style) with soaked grain, raw ingredients, bone broth and high-enzyme foods.
But since we didn't go excitotoxin-free until late 2009, many of the recipes from before that time will contain excitoxins (such as the modified tapioca starch in the Chebe Bread recipes).
I'm going to start by posting some recipes I've used, created or modified. I'm hoping that eventually readers will pitch in to contribute their own recipes, help test and modify other recipes, and contribute to the conversation. I also envision taking requests to find or develop recipes that fit certain dietary restrictions. Hopefully, this blog will become a helpful resource for those with dietary restrictions and those cooking for them.
Feel free to make requests or suggestions in the comments or by dropping me an e-mail at the address in my profile. I'd also love to hear how the recipes work for you, and enjoy hearing about any modifications you make. E-mails or comments always make my day, and often inspire me to try a new recipe or start posting again after a hiatus.
Subscribe to:
Posts (Atom)